Connect the App Engine URL: Back in the Google App's Routines Interface, Add a New or Existing Action, Then Enter the Generated App Engine URL From Step 4 Into the URL Field. Save and Name Your Routine Accordingly.
Practice Good Hygiene: Urinate Frequently, Especially After Sexual Activity, to Help Flush Out Bacteria From Your Urinary Tract. Wipe From Front to Back when Using the Restroom, Which Can Help Prevent Bacteria From Spreading From the Anus to the Urethra
You bought the Vive for fun but when you start SteamVR, you received the error message “Error 308”. It’s not a pleasant experience. Don’t worry, you’re not alone. This post will show you how to fix the error and bring you back to the game.
Try these fixes
You don’t have to try them all; just work your way down the list until you find the one that works for you.
- Start Steam as administrator
- End Steam and SteamVR tasks
- Fix SteamVR installation path
- Update your driver
- Reinstall SteamVR
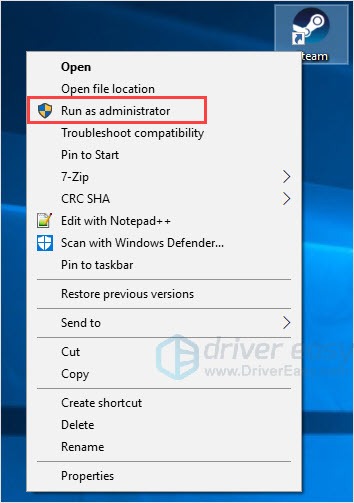
Fix 1: Start Steam as administrator
Run Steam as administrator is a simple but effective fix. This fix has helped many users fix their problems.
HOW : Right-click on Steam and chooseRun as administrator .
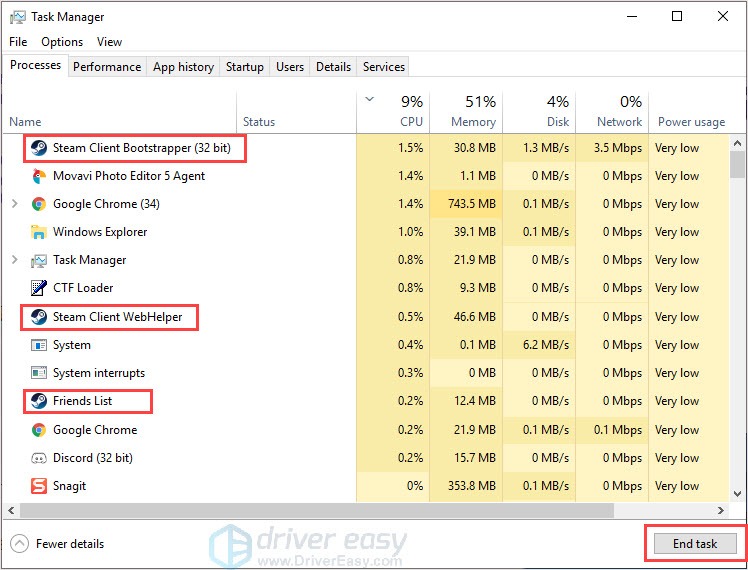
Fix 2: End Steam and SteamVR tasks
End Steam and SteamVR tasks then reboot them sound cliche but quite effective. It’s no harm to try such a fix.
- PressCtrl + Shift + Esc together to open the Task Manager.
- Choose a Steam task and clickEnd task . Repeat this process until you end all Steam related processes.

- Restart Steam and SteamVR to check.
Fix 3: Fix SteamVR installation path
When Steam was installed in a non-default folder and your SteamVR configuration path may be related to a non-existent path. This will cause you meet the SteamVR error 308. You can fix it by correcting the installation path.
- Close Steam and SteamVR completely.
- Navigate to “…/username/AppData/Local/openvr” and delete the “openvr.vrpath”.
OR
Navigate to “…Steam/steamapps/common/SteamVR/bin/win64” and runvrpathtreg to fix the path. - Reboot Steam and SteamVR.
Fix 4: Update your driver
The missing or outdated device drivers in your computer can result in issues. To rule it out as the cause for your problem, you should verify that your drivers are up to date, and update those that aren’t.
There are two ways you can update your driver: manually and automatically.
Option 1 – Download and install the driver manually
You can download drivers from the manufacturer official website. Search for the model you have and find the correct driver that suits your specific operating system. Then download the driver manually.
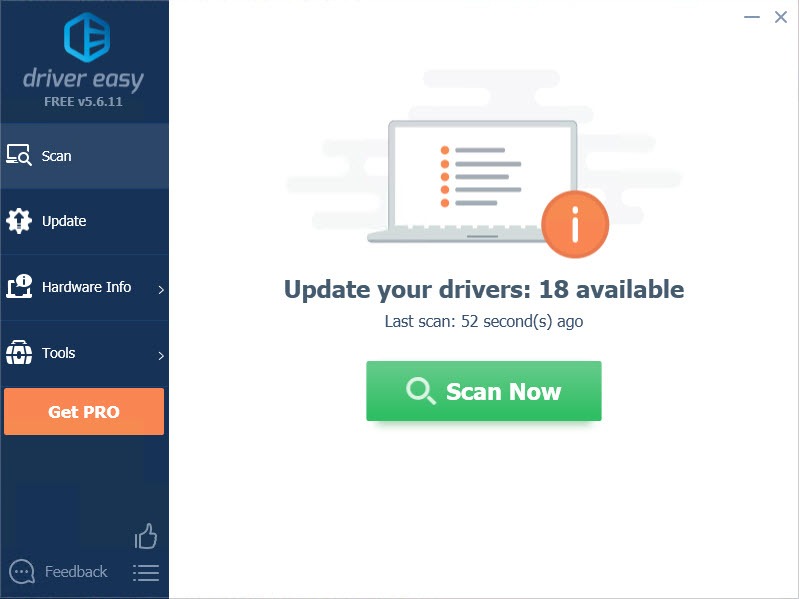
Option 2 – Automatically update drivers
If you don’t have time or patience to manually update your drivers, you can do it automatically with Driver Easy .
Driver Easy will automatically recognize your system and find the correct drivers for it. You don’t need to know exactly what system your computer is running, you don’t need to risk downloading and installing the wrong driver, and you don’t need to worry about making a mistake when installing.
You can update your drivers automatically with either the FREE or the Pro version of Driver Easy. But with the Pro version it takes just 2 clicks (and you get full support and a 30-day money back guarantee ):
- Download and install Driver Easy.
- Run Driver Easy and click the Scan Now button. Driver Easy will then scan your computer and detect any problem drivers.
- Click the Update button next to the flagged driver to automatically download the correct version of that driver, then you can manually install it (you can do this with the FREE version).
Or click Update All to automatically download and install the correct version of all the drivers that are missing or out of date on your system. (This requires the Pro version which comes with full support and a 30-day money back guarantee. You’ll be prompted to upgrade when you click Update All.)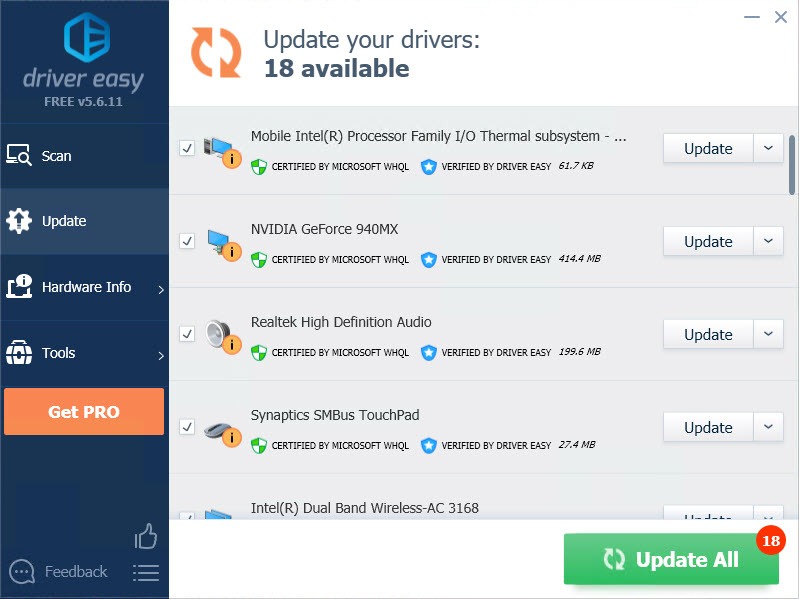
Note : If you have any problems while using Driver Easy, feel free to contact our support team at [email protected] .
Be sure to attach the URL of this article if needed for more expedient and efficient guidance.
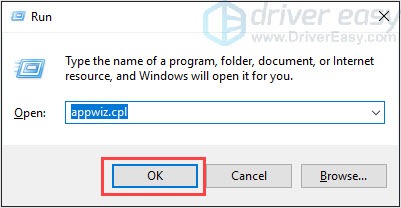
Fix 5: Reinstall SteamVR
If no fix works, reinstall SteamVR is a good option to try. When the installation files are corrupted or incomplete, the problem may appear and cause trouble.
- Press theWindows logo key + R together to open the Run box.
- Typeappwiz.cpl and press the Enter key.
- Right-click onSteamVR and clickUninstall .
- Go toSteam official website to download the latest version.
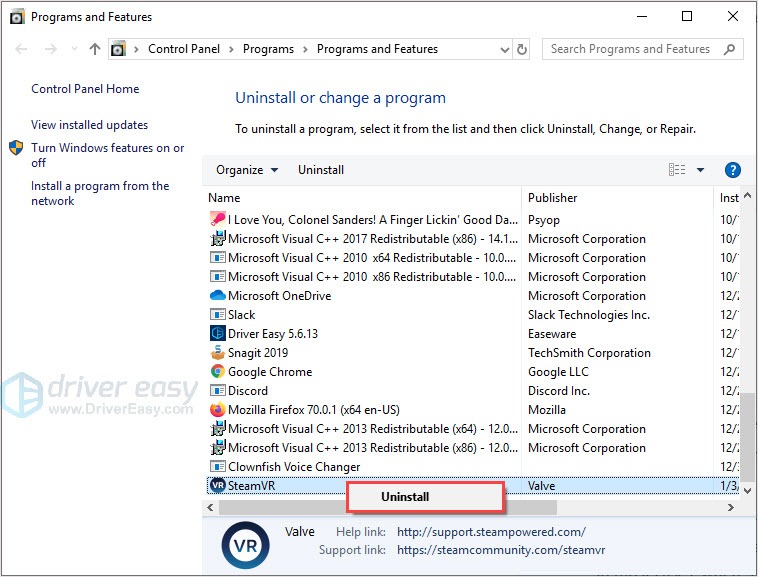
- Install and run the program to check.
So there you have fixes for SteamVR error 308 . If no fixes could help you fix the problem, you need to contact the customer service.
If you have any questions or suggestions, feel free to leave us a comment below.
Also read:
- [Updated] Gently Lower Sound Amplitude Tutorial for 2024
- [Updated] The Complete Reference for Content Creators YouTube Copyright
- Affordable Wireless Charging Pads for Modern Phones for 2024
- Beat the Blues with Fortnite: A Player’s Handbook on Fixing Error Code 84
- Diablo II Resurrected Won’t Boot – Effective Strategies for a Successful Start
- Enhancing Splitgate Experience: Effective Strategies to Fix Lag, Low FPS, & Stuttering Issues
- Glimpsing at Huawei P10's Thermal Management Tech
- How to Fix the 'Cannot Start Sea of Thieves' Problem Quickly
- How to Record Films Seamlessly Across Tech Devices for 2024
- In 2024, How to Cast Vivo Y78 5G to Computer for iPhone and Android? | Dr.fone
- In 2024, Unlock Focus Power Instagram Stories' Magnification Hacks
- In Pursuit of Clarity with BenQ SW320's 4K Screen
- Lego Star Wars: The Skywalker Saga - PC Crashes Solved for the Latest Updates of 2024
- Maximizing FPS: Activating and Using GPU with Cyberpunk 2077 on a Windows 10 PC
- The Master Key System | Free Book
- Tom's Tech Review: Expert Insights Into Computer Components and Performance
- Troubleshooting Game Loops: How to Stop Your Windows 11/10 Game From Crashing
- Troubleshooting Steps for Resolving Fortnite Error Code #84: Cannot Connect to Parties
- Ultimate Guide to Solving High Ping & Lag in Chivalry II
- Title: Connect the App Engine URL: Back in the Google App's Routines Interface, Add a New or Existing Action, Then Enter the Generated App Engine URL From Step 4 Into the URL Field. Save and Name Your Routine Accordingly.
- Author: Thomas
- Created at : 2024-12-17 22:04:34
- Updated at : 2024-12-19 03:02:11
- Link: https://program-issues.techidaily.com/connect-the-app-engine-url-back-in-the-google-apps-routines-interface-add-a-new-or-existing-action-then-enter-the-generated-app-engine-url-from-step-4-into-548/
- License: This work is licensed under CC BY-NC-SA 4.0.